Happy 2018 y’all!
I am excited about what this year has in store. After spending most of 2017 out on IR with a broken foot, I finally got the go ahead to kick off my boot & start living life again. For half the year I was not able to work, walk, drive, or anything else! So when I was completely cleared, I was SO ready to do something but was at a loss about how I was going to secure my next project.
I couldn’t really plan for it since I was at the mercy of God & nature to heal my broken bones. Turned out that a long time repeat client just happened to be ready for the 1 big project we hadn’t tackled in her home yet right around the same time that my broken foot was completely healed.
Divine intervention?! I’ll take it… and gratefully!
My client & I had of course kept in contact from time to time, but we hadn’t talked about my injury & needed to catch up on so many other things too, like her recent retirement & travel adventures.
So imagine my surprise when she called up 1 day and said “I’m ready to do my kitchen. And office. Oh and I would love if we could fit in Christmas decorations.”
One thing at a time… 1st up, the kitchen. I mean it IS the heart of the home. It’s functional but in need of an update.
(FYI if you want to skip right to the full before & afters, click here. Otherwise, to see all the details keep reading & enjoy.)
Here’s where we started – An early 2000’s builder basic kitchen
(I apologize in advance for the quality of the photos. These were taken in a hurry as the 1st set of contractors were prepping for granite installation.)

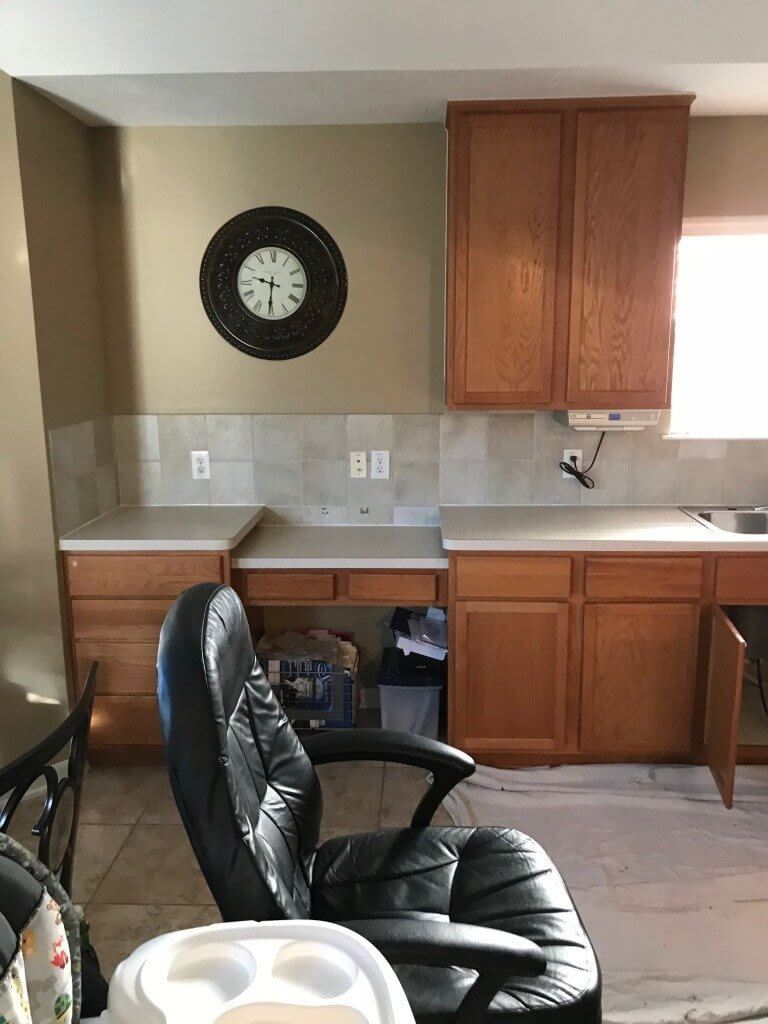

As you can see, we were working with standard builder grade finishes – solid oak cabinets, white laminate counters, monotone back splash, and the lighting… Lawd the lighting…
Anyway…
My client friend & I met up for lunch, got caught up, & set a time to talk specifically about her new kitchen. After working with her for years, I know her style to be clean & classic – she knows what she likes & doesn’t get into what’s currently trending. My kinda client!
1 week later, contracts were signed, planning in progress, & we were weighing options. Let the fun begin!
I normally don’t do “vision boards” or “mood boards”. I prefer 2D or 3D renderings, but those are most effective for space planning. That was not a factor in this makeover since there were 3 things in this kitchen that could NOT change:
- the footprint
- the flooring
- the appliances
So in this case a vision board just made more sense. And her she is… the master plan to take a builder basic kitchen to the next level!

New Kitchen Vision Board
Everything else could & would change. Kitchens can be tricky. Just like any other room, you have to set specific goals for the look, feel, & functionality. But more than other spaces in your home, you have to be very strategic about finishes & the order that items are chosen & installed.
These are big ticket HUGE items that are not easily changed. So unless you’re an avid DIYer with skills for days, don’t leave it to chance. Hire a decorator or designer & take advantage of their expertise & network of contractors.
As for this kitchen, the goal was to lighten things up – A LOT. And of course to stick to my Green design philosophy by reusing as much as possible & using eco-friendly products.
With windows over the sink & in the bay window (part door) in the breakfast room, there’s a lot of light streaming in. But the combination of the cabinets, counters, & poor lighting darkened the room.
So we got started in order of importance with:
1. Granite & back splash
These would dictate choices on the entire project. Specifically the granite – the back splash & cabinet finish are based on that choice alone. Even though we decided on painting the cabinets white & possibly adding plexiglass to those flanking the window over the sink, the shade of white would depend on the granite.
Same with the back splash – it’s easy to say “oh just pick a neutral tile in a finish you like” (marble, travertine, stone, glass, mosaic, you name it – options are endless). But neutral is not just neutral, just like white is not just white – there’s undertones to consider AND the fact that things change under lights & sunlight.
So 1st things 1st picking out granite. I know what you’re thinking & yes there are so many options for counters beyond granite – including some really amazing budget friendly laminates – but my client wants granite & has for a long time. Give the people what they want!
What she didn’t know is that there’s levels to this. Literally, there are different levels of granite that refer to the amount of variation in the “pattern” (“movement”) of the granite. The lower the level, the more uniform the “pattern”, the higher the level the more irregular the “pattern”.
Since she has a more traditional taste with a contemporary flare, I already knew that we would stick with a more uniform granite with a clean crisp white background.
And we chose… Dallas White!


But a BIG HUGE mistake was almost made… the rep at the stone yard pulled the correct slab, but when he provided the sample for the rest of the crew he wrote Ornamental White on the back.
Glad I caught that because look at the difference in Dallas White & Ornamental White:


We were going for bright & clean white (not muddied & little to no undertone) with more contrast in the specks on the background.
Ornamental White is clearly more off-white. Also, up close the Dallas White has specks that appear more blue & red toned against the crisp white background.
Now that that’s done & the back splash is chosen, I moved on to sourcing, procurement & purchasing. Done… almost, but more on that later.
For now, let’s talk about what a difference this change has made on it’s own!


It’s already pretty great. But it gets better. It was time for me to push my client out of her comfort zone a bit.
2. Kitchen Cabinets
Cabinets can be a big expense. If you’re thinking of remodeling your kitchen & your cabinets are in good condition, do what you can to salvage them. Even if you don’t want to reuse them, you can donate them to building supply re-sellers like Habitat for Humanity Re-store.
Since these cabinets were in excellent condition, we knew we wouldn’t replace them & had already agreed on painting them white. And since we made a great choice on the granite, we were able to stick with the original color scheme I’d chosen for the kitchen – Benjamin Moore Simply White for the cabinets with Luxe & Ravishing Red as accents.
But we had a moment of truth – my client is not into big bold color. She can take a tiny splash here or there, but was scared of what I would do with the Ravishing Red.
But again, I know what my client friend likes so I wasn’t surprised. I would just have to bring in more color that she loves. She LOVES blue. And during 1 of our sessions we talked about the accent wall I painted in the family room to disguise her TV. You can get a glimpse of it adjacent to the kitchen in the pic below.
She was talking about how much she loves that color, how that wall is 1 of her favorite parts of her home. I saw that as an opportunity!
“So I’m glad you mentioned that. I love that color too. How do you feel about using a similar color in a lighter shade on your island?”
Her: “You mean a different color from the rest of the cabinets? I don’t know about that.”
Me whipping out my BM color cards: “Yah see we can do something like this. It will bring in some contrast, coordinate with the blue wall you love & the other blues we are bringing in, but still keep things light.”
Her: “I’ll have to think about that. Can you give me an example?”
Me: “Yah think about it a little & I’ll be right back.”
Off I go to Eko Paints to pick up samples. By the way, I hadn’t been to the shop since the grand opening in February 2017 because of the broken foot. But Renee, 1 of the 2 owners, immediately recognized me & we got to talking about why they hadn’t seen me in so long. That felt really special.
Back to the topic… back at the job site, I painted some swatches on the cabinets & told my client there was no going back now.

But I kid. Of course we could still stick with all white, that’s what primer is for. But in the end she said “you’ve never steered me wrong before, I TRUST YOU, let’s do it!”
You don’t have to tell me twice. Done!
Here are the painted cabinets in all their glory! Professional Group Renovations (PG Reno) did an excellent job on these cabinets! I could not be happier to see my vision come to life.
You can really see the difference lighting makes. On the left the lights in the kitchen are on & it’s not too sunny out. On the right no lights are on inside because there’s lots of light streaming in from outside.


3. Hardware
We had a little snafu with the hardware. I’d originally shown a style of pulls & knobs on the vision board that changed over the course of the project. Mistakenly, I left both at the job site & the original set was installed. No problem, just switch them out right? For the knobs, sure. for the pulls, nope – different center to center measurements.
Still, no problem… the contractors know what they are doing & got it fixed up right away. These details really do make a big difference.


Now that we’ve gone to the trouble (& expense) of all replacing everything including the kitchen sink, it would have been a shame to leave the original white plastic switch plates against the sleek new back splash & island.
Changing out 16 switch plates might have been the best $30 (or so) spent on this project. Instead of being a utilitarian afterthought, they are a design element that coordinates with the new faucet, knobs & pulls, & even the light fixtures.

Speaking of light fixtures… remember the boob light and fluorescent overhead light? Well we took care of those, including centering the new light over the sink (did you notice that the boob light was installed just to the right of center?).

4. The Breakfast Room
Next we had to address the breakfast room. My client told me that she wanted to include a new table in the design but remembered me telling her years ago to not buy furniture sets. She already had a set that had a wrought iron base with a marble tile top, 4 chairs & 2 bar stools with marble inset in the backs.
She had been looking around for most of last year after the top of her table had started to crack & break off on the edges. The chairs & bar stools were fine, only the table had issues.
On the vision board, I’d found a table I felt would be perfect only to find that it was out of stock & could not be found anywhere. By anyone.
Then I remembered a post in my neighborhood Facebook group for a young man who’d decided to go full time into his woodworking business. I looked him up – after a few emails & text messages, and a phone call we’d talked specs & started working on a custom table top specifically for this project.
Jody Amerson owns Amerson Custom Woodwork in Katy, TX. Working with him was amazing, refreshing really. His only concern was making the piece to spec, getting it right, & having a satisfied customer who could become a repeat customer.
And satisfied I am. I mean my client is!
Take a look at what he created from specs & a photo of the table base all shared via text message. These photos were taken the very 1st time we met in person. Jody had picked out the wood & completely built the table top within a week without ever seeing the base or the space it needed to fit. Then he delivered & assembled it directly in my client’s home the Saturday before Christmas!


With the table done, it was time to update the chairs to fit in with the overall design.


And the breakfast room came together nicely I think…

Final product in the client’s home
5. The Chef’s Desk
This was the last area to be addressed. When we 1st talked about the kitchen in general, my client said she didn’t need the chef’s desk anymore because she wants to get her office done next.
I had lots of ideas about what we could do with this space, but in the end none really fit her lifestyle. And since a big change wasn’t really needed, we decided to keep it as is. She or her grand kids could always use it for quick little things. Except it needed a little something.
Shelves can solve so many design dilemmas! I installed these specifically to display some items that are special to her & shopped her home with her to find just the right pieces.


She wasn’t there when I completed this display so I was happy & surprised to get this the next morning…

So now you’ve seen bits & pieces, all the individual parts of this new kitchen. I’ll stop with the suspense just show it to you already!
Builder Basic Kitchen goes Semi-Custom
The Vision
The Results


In the end, the ONE THING my client (& all my clients) ask is that we do not do anything trendy that may or may not stand the test of time. They want the style & the functionality to last. If you need help with any area of your home & are interested in timeless design, contact me for a free initial consultation. I’d love to be a part of your next project!
Until then, what do you think of this transformation? Share your thoughts & feedback in the comments.

The before and after of this kitchen looks amazing. I am absolutely obsessed with kitchens and I agree that they are the heart of the home!
Hi Jasmine! Thank you! I love kitchens too & midway through this makeover I knew it would be a great 1! Now I wish I had this kitchen!